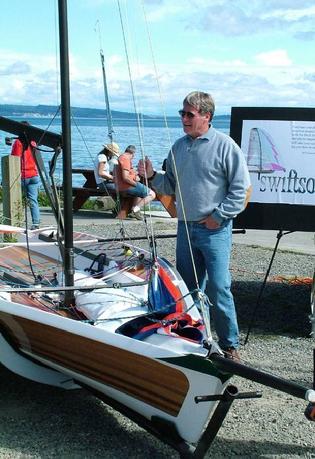
This is the start of a list of things that went wrong (on someone's boat) in the order of seriousness.
Issues and Problems
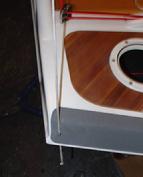
- broken shroud adjustment plates
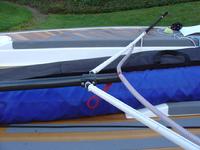
Some of the early shroud plates were built with too little consideration for stress and fatigue. Either make these plates out of 1/8� 6061 aluminum plate or use the new method shown in picture 1. If using the new method, use a layer of carbon, over two layers of hybrid, over four layers of s-glass, over two more layers of hybrid, over another layer of carbon.
- broken spreaders�how to avoid
Use the prescribed method PDF to build these. The failures that have occurred while sailing have been with the foam cored spreaders. If you are going to use the foam core type, YOU ABSOLUTELY MUST honor the integrity of the trailing edge. Cut the last �� off of the foam blank and extend the layup well beyond the edge. IF YOU SAND MUCH NEAR THE TRAILING EDGE YOU WILL DESTROY THE INTEGRITY OF THE ENTIRE SPREADER. IT CAN NOT BE FIXED�THROW IT AWAY
- broken or bent tiller extensions
In the early days of sailing skiffs, broken tiller extensions are fairly common. Always have a spare on hand. If you bend one it is easily straightened-- as long as you show patience (and it is not kinked). Very slowly and gently begin bending it back�just a little at a time on a soft surface like a towel or your leg. Continue to sight it between times to see where the max bend remains. I�ve straightened these things several times on 49ers with no breakages while watching others try to bend them straight in one movement without success. Carbon is, in my opinion, not the answer.
- broken centerboards and rudders
Once again, this is mostly a trailing edge problems on foam blanks. I�ve had no trouble after three season with foam cored blades and I know of a couple of others that have held up well (the rudder on 002 as an example). The key is the integrity of the lay-up at or around the trailing edge. In lieu of aggressive sanding, use some filler with glass strands if you have a low spot or want to extend and sharpen the trailing edge.
- shroud levers opening accidentally
Use some snug wire ties around the levers. These can be slid down to open the lever and slid back up till tight after closing (the lever is tapered)
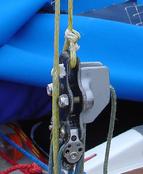
- Vang system problems
This vang system is necessary to keep the boom from pivoting on the Swift. If the boom pivots, the mainsheet cleat will never be in the right place and it will be very annoying (I�ve tried other systems)
- sliding pivot base
The sliding pivot base is a huge improvement in that it allow you to get the vang adjustment correct. Adjust it by pulling the Cunningham on fairly hard. At this point adjust the sliding base till the vang lever is well forward 3� from the mast. You will likely ever adjust this thing again unless you change your setup significantly (mine has not moved in two years)
- broken vang arms
Not too much you can do to keep these arms from breaking if you jump off the gunwhale onto them during a capsize. Make a spare set and keep them with you. Always head over the rail toward the centerboard as soon as you detect a capsize may occur. Often times you�ll save the capsize by doing this. If you do find yourself standing on the center toe rail with the boat on it�s side, step forward to the mast and throw your leg over facing aft (the gunwale is much lower up forward and you can easily move to the board because you are facing it)
- improper set-up
If you fail to set the vang up properly as described above, you may cause some significant problems. First, you�ll not have much power in the vang and second you�ll be loading the lever in a direction that it is not intended to be loaded. When making the lever, do use 10 layers of s-glass sandwiched between three layers of carbon on each side. It�s often best to make three levers at a time to minimize waste (you can always sell one and keep one for a spare).
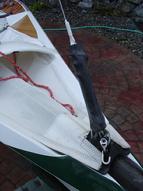
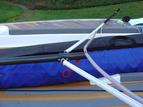
- torn kites
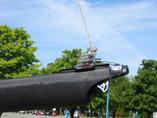
This is almost always the result of some sharp in the bow or forestay area. Tape all exposed sharp things or cover them with a bicycle inner tube (this includes split rings) See picture 2
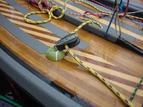
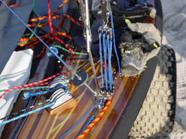
- mainsheet cleat angle not correct
This can be very annoying but you must not let it go. Unless you get it right, sailing a Swift is not a pleasant experience. Begin by putting the platform is the prescribed place. If you move it aft on the boom you are in for a nightmare for which there is likely no solution. Because you typically sail a Swift to weather in flat water with your forward foot slightly forward of the chain plate and with the boom sheeted all the way in, this is the place to start. The mainsheet angle should be centered on the cleat when the sheet is about four inches aft of the shrouds. (See picture 3) Since you are likely trapping a bit high, you will need to drop your hand down to the center of your thigh to uncleat it and it should remain cleated when you pull from about three inches about your thigh. As the wind and waves pick up, you�ll find that you need to move aft and sheet out a bit. The cleat will remain perfectly positioned. As you move further aft to bear away onto a reach, it will normally stay well positioned. Take the time to move it both up and down or forward and aft if you need to. It will be worth the trouble.
- cap shrouds breaking at spreaders
This can be a disaster that is completely avoidable. Make sure that the holes in your spreader tips are well rounded at the top and bottom and make a cover for your shrouds (PDF to follow)
- tiller breakages and other elements of rudder system
If you fall on your tiller, be glad that it breaks instead of the transom bar or transom. Keep a spare tiller with you in the early days of sailing the Swift. It�s actually a good idea to team up with some friends who sail Swifts and make a complete spare cassette and rudder to take to events. If someone breaks a tiller, they can quickly change the entire cassette and rudder and get back on the racetrack. In the evening the broken tiller can be replaced as long as you carry a West System repair kit with you (a must have for all serious sailors)
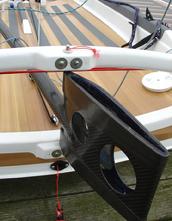
- transom bridle anchors�knee damage during tea-bag
Replace the plastic eyes (or anything else you have on the gunwale near the transom) with the new system. See picture 4. During a tea bag incident, the boat will heal to weather, sweep you off the rail and aft. If you are skillful, you can push or pull on the tiller and recover. However, as the boat comes back upright, the trap wire will lift you out of the water and you�ll swing forward, often before you can get you feet out in front. You will invariably hit the transom corner and anything that is not smooth will damage your body. This fitting nearly always seems to be the target.
- mainsheet strap coming off harness too easily�the fix
We need to get rid of the Velcro on these straps and go to snaps. I�ll find a snap tool and do a report on this since I find that the Velcro only remains good for a very short time in this application.
- shock cord adjustment on tiller�what works--what doesn�t
this is the best of several systems that I�ve tried (Picture 5)
- transom bridle knot coming through block on boom and sticking�how to avoid
The double eye splice is the answer to this problem (look for PDF soon)
- spinnaker sheeting system fiascos�an opportunity to really make your boat hard to sail
After trying two systems to find a way to sheet from further aft in order to loosen the leech of my kite, I�ve concluded that the spinnaker sheet blocks need to stay where they were. Both systems slowed down the gibing process substantially. The problem is that the kite leech rule is a bit short, however, if we make it longer, you can�t see under the kite and will be sailing blind. A possible solution is to make the leech about 4 inches longer and remove most of the foot roach from the kite. I�ll talk to the sail makers about this to see if that is a good idea.. Incidentally, if your kite sheets are too long, you will have trouble with your kite hour glassing.
- trapeze handles / systems-- failed attempts 1 through 200
I�ve wasted more time on what I thought were brilliant ideas/improvements for trapeze systems. While we need to continue to pursue better, lighter, faster, cheaper ways, let me know what you are thinking and perhaps I can save you some time. Otherwise, I�d advise that you stick with the system shown. (Picture 6)
- not enough travel on Cunningham
I�ve now changed over to using the pivot cleat on the center toe rail for the Cunningham. Pictures to follow
- righting line balls
The hard plastic balls on the righting lines will make small dents in your Swift if you let them go from any distance (shock cord). Instead use a monkeys fist on the end of the rope to keep it from pulling through. http://www.igkt.net/beginners/monkeys-fist.html
- lines getting caught on pintle �L�
The best thing to do is to cut the �L� off of your pintle and drill a small hole for a split ring. Or, you can cut it off and thread one end for a cap nut. Lines will get caught on it otherwise.
- aluminum mast sleaves
Some of the aluminum mast sleave inserts have corroded inside the mast and have become impossible to get out. If you are going to use the two piece mast, make sure you use a carbon insert sleave.
- non-skid
Do not use the 3M �coarse� non skid under any circumstances. It will destroy your wetsuit in a matter of hours and will then remove your skin.
- construction errors and opportunities
- securing strips to stations
- long boarding both deck and bottom
- body work�how to make it perfect
- overlapping s-glass
- filling holes--outgassing
- eliminating blemishes that show through the s-glass
|